Intro
Shortcuts is Apple’s built-in automation app for iOS and macOS, which is so surprisingly powerful that the shortcuts can practically be considered as mini apps, as they integrate quite deeply into both the system and third-party apps, and it has quite advanced functionality such as a HTTP client, support for JSON, and support for regex (which is more than I can say for Microsoft Power Automate).
Although I’d briefly dabbled with it back in late 2021 for simple things like notifying me when the battery level fell below a certain level, something enticed me to play with it again back in late 2024. At the time, the only idea I had was to create a simple wrapper for the ChatGPT app to make it more convenient to use.
I never imagined I would spend so much time, effort, and eventually money creating so many advanced shortcuts, and even my own native Shortcuts expansion app, MoE Code!
This is a collection of my hard-learned lessons.
Index
Shortcuts
All of the shortcuts I’ve created are freely available at https://routinehub.co/user/mythofechelon. I think my personal favourites are:
Ask ChatGPT, because it’s one of the most advanced and complex things I’ve ever created.
MoE Shortcuts Toolkit, because I’ve saved myself incredible amounts of time and really elevated the maturity of my development process.
Resize With Fill HDR, because I’m convinced it was a world-first, and it made posting to Instagram bearable for me.
Spotify: Shazam, because it’s just so convenient.
As for my advice…
If statements
Apart from the obvious, if statements actually have other helpful uses:
To temporarily hide groups of actions. Simply move them inside, choose a condition that always evaluates to true (e.g., “
If Device Details has any value”), tap on the if symbol, and tap “Collapse”.To temporarily disable groups of actions. Simply move them inside, choose a condition that always evaluates to false (e.g., “
If Device Details does not have any value”).To move groups of actions. Simply move them inside, move the if statement, tap the delete symbol, and tap “
Keep Actions”.
Pro tip: After pasting an if statement, you can quickly tap and hold anywhere on the screen to stop it auto scrolling to the End If.
Named variables
Shortcuts has two different kinds of variables:
“Magic” variables, produced automatically by almost all actions. These are good to start with, but they can quickly fall apart for large and/or advanced shortcuts because (1) they use GUID-based linking which breaks when copying an action between shortcuts and (2) they disappear very quickly from the variable picker when you scroll “far” away from it. To solve these problems, we use…
Named variables, produced by actions “
Set Variable” and “Add To Variable”. These do not have the above problems:If an action uses a named variable then all it cares about is that the name is the same - the variable can be overwritten or something, and the actions are none the wiser.
The list of named variables in the picker grows seemingly infinitely.
Also, they can be easily renamed - once the names in all of the instances of the above actions have been changed, all usage will reflect this renaming.
Data types and properties
When you use a variable in an action, you can tap on the variable to change its data type and then its property, which will change data provided to the action. For example, with if statements, if you change the left variable’s data type to number then comparison operators like “is greater than or equal to” will appear.
An important note here is that these changes are unique to each usage - they do not mutate (change) the original. It’s basically manual type casting (conversion).
Automatic type casting
Shortcuts sometimes has some very strange automatic type casting:
Booleans are usable as their normal typed values (true and false) but also as string “
Yes” or “No”. For some reason, the latter are used when using the proper Boolean values in a text context, rather than literally “true” or “false” like every other language. This even happens the other way around - for example, setting an on-off toggle button to use a variable that resolves to “Yes” or “No” will enable or disable it, respectively.Action “
Ask for Input” always outputs text, even if you set it to ask for a number. To work around this, pipe the output into action “Number”, but first check if any input was actually provided, otherwise you’ll always get 0.
Non-existent vs empty values
You might wonder what the difference is between if statements’ “does not have any value” and “is <empty field>” (I wish the placeholder text said “something” instead of “anything”).
The first means that the variable hasn’t been created / defined, and the second means that it has but with a blank / empty value.
To see this for yourself:
Create a dictionary with one key but no value.
Use “Get Dictionary Value” on:
The key that exists.
A key that doesn’t exist.
Show Content vs Show Alert
You might wonder what the difference between these is.
Show Content is my go-to because it correctly renders different data types (e.g., JSON or images), handles long lists of text properly and performantly, auto links to the variable above it, and you can select the text. However, you can’t set a title, you can’t disable the cancel button, and it won’t show anything at all if the input does not have any value.
Show Alert is the complete opposite of the above.
Loops
Shortcuts’ loop actions “Repeat” and “Repeat With Each” are very useful, but incredibly inefficient at scale - they are very slow and use crazy amounts of power. Seriously, the number of times my iPhone has heated up to the point where the system throttles the display’s brightness is crazy.
A lot of actions natively support lists for inputs and outputs, so try to use those for simple uses cases instead. For example, if you want to bulk get, convert, and save images, the actions themselves can be used as-is with no need for a loop.
Finally, as unlikely as it is, if you have the option of using native Swift code instead then do so, as the performance difference is staggering. For example, I recently created an outside loop of around 30 actions and an inside loop of around 6 actions, and when running the outer on nearly 550 items and the inner up to twice per iteration, it took just over 3 minutes to complete, so I rewrote the whole thing into one dedicated action, and it completed in less than 1 second. If you want to see this exact use case for yourself, the legacy “code” is still in https://routinehub.co/shortcut/22016/ → “Find invalid variable references”.
List contains
Unlike “proper” languages, if statements’ comparison operator “contains” treats lists as strings, so this actually performs a substring match. So, if a list contains “No failures detected” then “If <list> contains fail” will match.
To check for a full-string / value match, use action “Filter Files” with “Name is <value>” and then do “If Files has any value”.
Dictionaries
To dynamically build a dictionary:
Use action “
Set Variable”.Use action “
Set Dictionary Value” on the above named variable. This produces a new dictionary - it does not mutate (update) the original.Use action “
Set Variable” with the above again.
Use dictionary objects where possible over JSON strings, as it performs automatic actions like validation and double quote escaping.
“Get Dictionary Value” uses dot notation for traversing keys, which is often useful, but if your keys contain a dot (e.g., “gpt-5.6-luna”) then you’ll need to split up your steps.
“Set Dictionary Value”:
Does not support dot notation.
Supports setting any data type, provided that it’s passed in the correct format, with the exception of lists / arrays that only contain one item - it will unwrap it to just that one item.
(Due to the above, I ended up creating action “Set Nested Dictionary Value”.)
Files
iOS’ handling of files is particularly odd, so here’s my advice:
Any action that only mentions “
File” also supports folders.Some actions (e.g., “
Get File from Folder”) ask for what I call a “top-level” folder path and a relative path. For those, always set the first to the highest level possible (e.g., “iCloud Drive” or “On My iPhone” / “On My iPad” - the latter two are the same thing).Other actions (e.g, “
Rename File”) require a “File”-type object. For those, you need to pass in the output from another action.When setting file extensions, iOS ignores the filename that you provide and instead inspects the contents to determine what it is for itself. To override this, use “
Set Name” on the contents with a “name” of something like “public.json” and then write the contents to the file.Do not use ASCII colons (“
:”) in file or folder names, as iOS silently replaces them with forward slashes - yes, the same character that delimits folders and files, which creates all sorts of problems. Instead, use Unicode colons (“꞉”). If you do end up in this situation, when needing to interact with them, you need to always use the unescaped names, which you can get from property “Name”. However, property “File Path” returns the escaped versions, so if you need to reference a file’s folder name, this is why I created action “Get File / Folder Properties”.Action “
File” is the only one I know of that automatically updates to reflect external changes to the target, so if the selected file or folder is renamed or moved, the action will update to reflect that (as the file system uses GUIDs). So, be aware when sharing shorcuts, as if you’re doing something like renaming a folder then once you’ve run it yourself the content of the shortcut will have changed. A workaround I found for this is to always first create the file or folder to guarantee that it exists as expected - nothing happens if it already exists.Attempting to rename a file if it already exists will fail with an error.
To dynamically get the contents of a folder, first “create” the folder by path and then pass that output into the action.
Property “
Name” often is actually the content. To work around this, use “Get Details of Files”.
Regex
Regular expressions are supported mainly via two sets of actions:
“
Match Text” and “Get Group From Matched Text”.“
Replace Text”. Use “$<number>” to reference capture groups in the replacement.
These support the following modes / flags by prefixing these strings to the patterns:
“
(?m)”: Multi-line mode, so “^” and “$” match the start and end of each line, respectively, rather than the start and end of the entire string.“
(?s)”: Dot-all mode, so “.” also matches newline characters.
Misc
An odd behaviour I’ve only ever seen once: Action “Send Message via WhatsApp” automatically passes through the variable above it, even though there’s nothing in the UI to suggest that this will happen.
Always use “Calculate Expression” over “Calculate”. Quite often, you need to include another number, but the former can only take 2 numbers, so you have to delete it, recreate it, and then relink it everywhere.
Expansion apps
While Shortcuts has lots of official actions, they don’t cover anywhere near everything, and you will eventually need to do something that it cannot. That’s where expansion apps come in.
Sindre Sorhus’ Actions app is by far the most famous and useful. There are a couple of other notable mentions too, like Scriptable. There’s also my own, MoE Code, which we’ll get to soon…
Triggers
Shortcuts can be run in a bunch of different ways:
The Action Button on iPhone 15 Pro and newer is my favourite, or Back Tap, both of which are set up via the Settings app. When pointed at a dedicated shortcut, you can make what it does contextual - using a few of mine for example:
If the orientation is Landscape Left or Landscape Right and audio is playing: Set brightness to 100 %.
If AirPods Pro are connected: Toggle between playing media with Active Noise Cancellation mode and paused media with Transparency mode.
If Spotify is open: Run my shortcut Spotify: Move Song To Top Of Playlist.
If the time is after 22:00 and before 06:00, is connected to power, and is not in sleep focus mode: Turn on sleep focus mode, get the weather forecast for the next 12 hours, and turn off all the lights.
Share Sheet, set up from within the shortcut itself. Useful for passing items like images, audio files, URLs, etc into shortcuts directly from within apps like Photos, WhatsApp, YouTube, Safari, etc.
Automation rules, set up from within Shortcuts. Using a few of mine for example:
Run a shortcut daily at 06:00 (they do run when the device is locked).
When Airplane Mode is enabled, run my security shortcut MoE Airplane Mode to counter thieves.
When a certain app is opened or closed, connect or disconnect a certain VPN respectively.
When battery level falls below 30 %, enable Low Power Mode if not connected to my home Wi-Fi.
When arriving at my bus stop between 07:00 and 09:00, run my shortcut Monitor My Cardiff Bus.
When my wake-up alarm is stopped, disable sleep focus mode.
Lock Screen button, set up via the customisation screen. I have one connected to my shortcut Spotify: Shazam so I can rapidly use it when out and about.
Via Siri. Simply say “Hey Siri, <shortcut name>”. For example, I had one called “I’m cold” which turns on the heating (before I bothered to set up schedules).
From the Home Screen, like an app. Just go into the shortcut and then tap the “i” symbol → “Add to Home Screen”. This is also a great way to run a shortcut while you’re developing it without losing your place within it (as running it from within Shortcuts auto scrolls to the actions as they run).
Limitations
As great as expansion apps are, they can only add to the existing infrastructure, which has several annoying shortcomings compared to “proper” languages, some of which have workarounds, and some do not:
No try-catch support, so if an error occurs then the entire shortcut stops.
No parallel or async processing, so everything is sequential, which is exacerbated by iOS’ heavy throttling of Shortcuts performance.
No exit codes, so there’s no consistent way of checking whether an action performed as expected.
A single instance of an action can only run for a maximum of 30 seconds (for now - “
LongRunningIntent”s are coming in iOS 27).No break statement, so there’s no way to exit a loop when it’s no longer needed.
No while loops, so the best you can do is repeat for a sufficiently high number of iterations.
No functions, so you’ll have to have duplicated sets of actions, unless you want to spin them out into a dedicated shortcut and deal with prerequisite management, which is rarely worth it.
No native support for a prerequisites, user config, or self-update processes, so I ended up creating my own: MoE Template. (Yes, Import Questions are a thing, but we’ll get to that..)
Bugs
As much as I love Shortcuts, it can be a big of a buggy mess. Although, to be fair, having re-read https://mythofechelon.co.uk/blog/2024/10/20/apple-software-wishlist#siri-shortcuts, it has gotten better recently.
However, the following persist:
Since iOS 26, it’s far too easy to accidentally tap on “Add Condition” while rapidly scrolling through, which prevents execution. I even added a dedicated, automated check to my toolbox because this happened to me so frequently..
Sometimes, an if statement’s only comparison operators will only be “
has any value“ and “does not have any value”. To fix this, you need to tap on the left variable, tap on “Type”, and tap on the correct data type (even if it’s already set).The privacy / permissions process is insanely flawed and inaccurate in that it basically tracks all data gathered, and if anything external is used then it assumes that you’re sharing all gathered data with it.
The “
Ask For Input” text field often collapses to nothing, and needs to be reset by changing to a different screen (e.g., opening or closing Shortcuts).When an if statement’s left variable is changed, even if it’s the same data type, the comparison operator resets to “
is” or “has any value”.While not quite a bug, it is irritating that the undo-redo function doesn’t track certain types of changes, like renaming of magic variables or certain action parameters.
Cut, copy, and paste often only work the second time.
Import questions. I really tried to use these in the early days, but they were so astronomically screwed, I just gave up, created my own process, and never looked back.
When auto-scrolling to an action that’s hidden (e.g., in a collapsed if statement), it will just scroll all the way to the bottom.
There is a massive gap at the bottom of every shortcut, introduced in iOS 26. This seems to get worse with the number of actions in a shortcut.
Custom actions
To create custom actions, you need:
To know Swift, and a bit of SwiftUI. I used https://www.hackingwithswift.com/100, as recommended to me by Sindre Sorhus - the developer behind the Actions app!
A Mac. My refurbished Mac Mini 8-core M2, 24 GB, 1 TB from January 2023 was £600 as of March 2026 and has worked beautifully for me - thanks, Hoxton Macs! I did try to use Scaleway’s cloud-hosted Macs, but the VNC latency was terrible, and Apple require that vendors charge monthly regardless of actual usage.
An Apple Developer Program membership. This is $99 per year.
Patience.
I’ve learned a lot over the past 6 months, but I am still a newbie, so I may be wrong on some of the following points, although I have tried to check each thing along the way. So, this blog post and particularly this section are sort of a snapshot in time of my experience. However, if you can correct anything, please do!
Also, this section is not as thorough as usual, because all I cared about in the beginning was getting something working and functional, so I didn’t make super detailed notes along the way of every roadblock, how it was fixed, and why it needed to be done that way. But I am aiming to continue updating this for a little while.
The result of my work is my app, freely available at https://apps.apple.com/gb/app/moe-code/id6761283435
Swift
Swift has a lot of quirks, but by far the main one for me was optionals - variables that may either be the declared type or “nil”. For example, “String?” or “Int?”.
I’d worked with these a little bit before in Microsoft Power Automate and I guess regex, but never in a statically typed programming language.
So, because there’s uncertainty about the data, these need to be “unwrapped” whenever they’re accessed. There are a few main ways of dealing with these.
Optional binding
This is denoted by using one of the following:
“
if let”. For a simple example: “if let identifier { return identifier }”. In this case, the variable is only available inside the block.“
guard let”. For a simple example: “guard let identifier else { <exit> }”. In this case, the variable is accessible after / outside of the block.
Optional chaining
This is used when accessing a property and is denoted by using a question mark. If any part of the expression evaluates to nil, all of it does.
For example: “URLComponents(string: urlString)?.url”
Optional try
Instead of using do-catch, you can use “try?” to convert any thrown error into “nil”.
For example: “let jsonObj = try? JSONSerialization.jsonObject(with: jsonData)”
Conditional casting
This tries to convert data to a different type and returns “nil” if it fails. Also, I do love that multiple conditions can be on one line / statement.
For example: “guard let parameters = action["WFWorkflowActionParameters"] as? [String: Any], let commentText = parameters["WFCommentActionText"] as? String, let match = commentText.firstMatch(of: /^\+\+\+ ?(.+)?/) else { continue }”
Nil coalescing
This is denoted by using a double question mark and then providing a fallback value.
For example: “let key = intent.keyValue ?? widgetDefaultKey”
Force unwrapping
This is denoted by using an exclamation mark, but it should only ever be done if you’re certain that the data will be as expected, otherwise it will crash.
For example: “if results.count == 1 { identifier = results.firstObject!.localIdentifier }”
AppIntents
AppIntents are what make pieces of your app available to Shortcuts, Siri, etc. They too have a lot of quirks. For example:
One of the core tenets of programming is not to duplicate things, yet Swift / AppIntents forces you to do so surprisingly regularly. For example: I have standardised parameters, and therefore the descriptions are always the same, but if I try to use a variable for them then I get build error “'LocalizedStringResource' must be initialized with a call to its initializer or a string literal”.
Array parameters:
Can only accept one data type, so you have to do a lot of data correction from string. (This was especially true for me because mine accept strings, integers, doubles, Booleans, arrays, dicts, etc by themselves or in a “proper” list, a JSON array string, or a delimited string.)
Only work in Shortcuts if they’re part of the parameter summary. Otherwise, they’re extremely buggy, to the point of being unusable - I was not able to pass / link a variable or even type a full word.
If a parameter’s data type or variable name are changed, it will reset to default in Shortcuts, so I’d recommend always using lists / arrays just in case.
The returned value can only be one static type of custom or certain supported ones, of which the most notable absence is dictionaries, so they must always be serialised to a string. Also, I would recommend always returning a list (e.g., “
some ReturnsValue<[String]>”) - if there’s only one item then Shortcuts collapses / unwraps it anyway.If the “
AppIntent” object itself is renamed, it will become “Unknown” in Shortcuts. Although, you can work around this by renaming and then adding “static let persistentIdentifier = "<old AppIntent name>"“.
Xcode
Targets
In Xcode, targets are basically components, such as iOS App, iOS Widget Extension, watchOS App, etc.
Each has its use cases, limitations, resource allocations, version and build numbers, schema, assigned platform, etc.
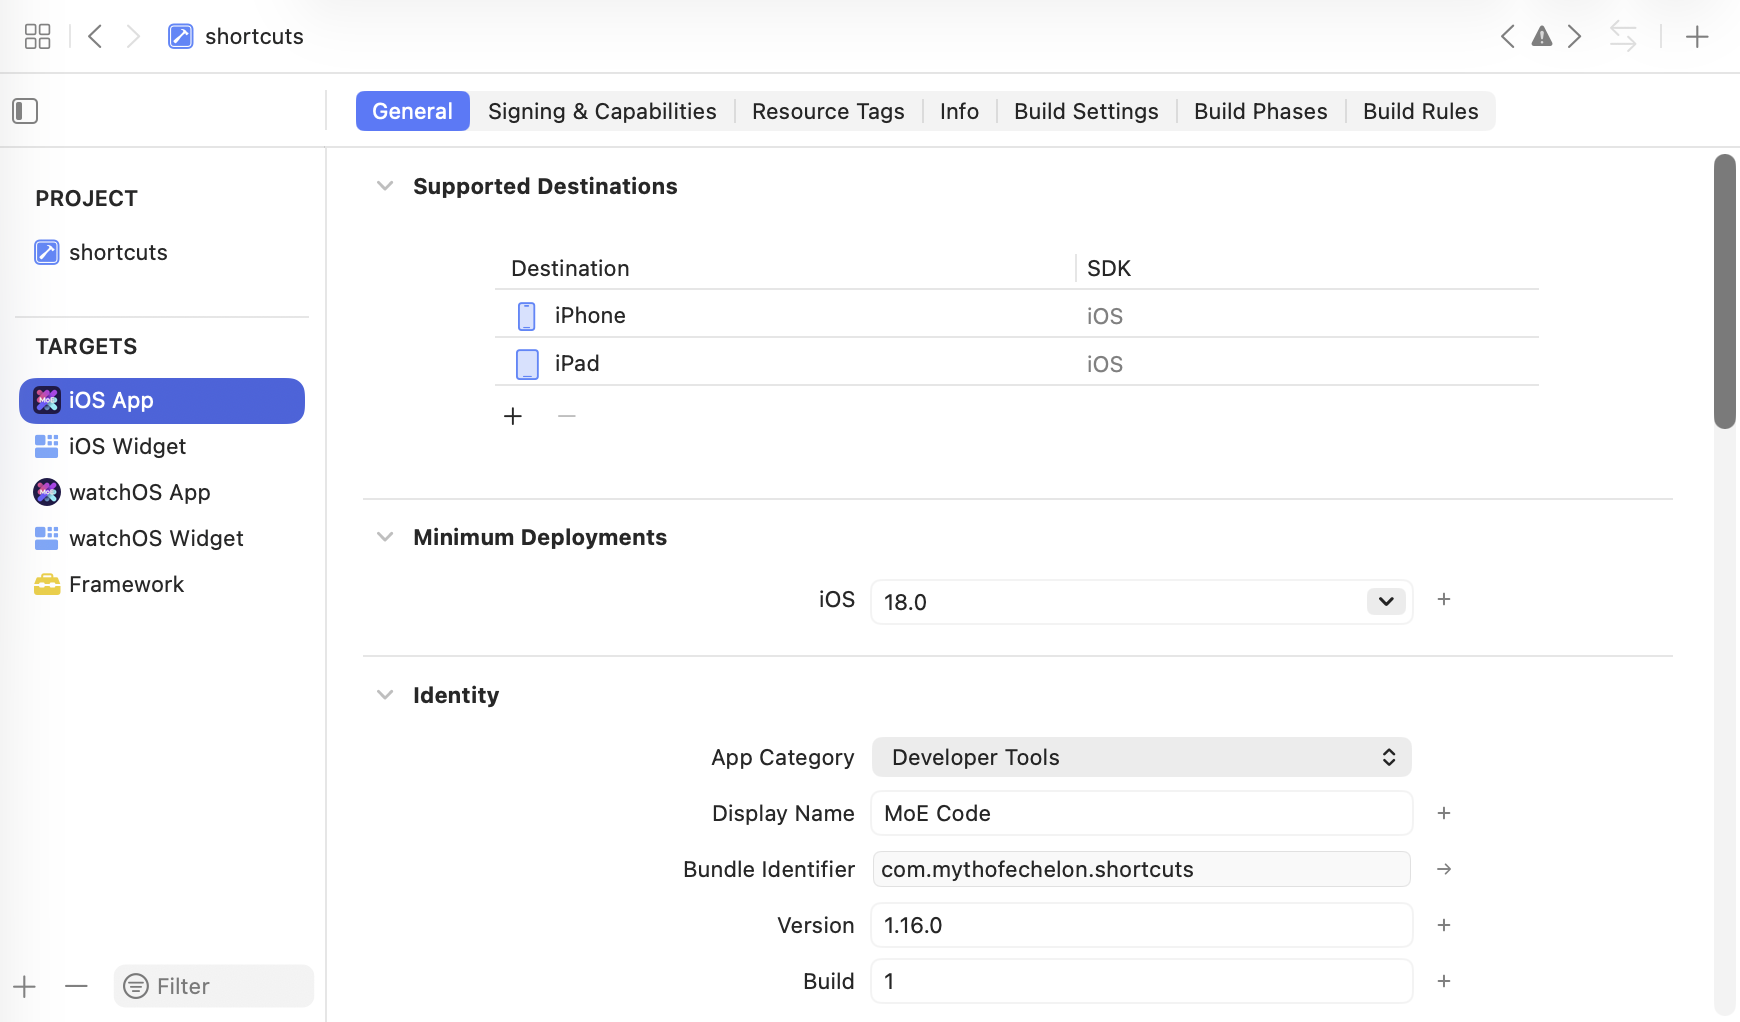
Each Swift file has target membership so that it’s included in the build. While code can be shared across targets via memberships, I’ve found it to be overly complex and prefer…
Frameworks
A Framework is a type of target, but its code can be literally “import”-ed into other Swift files. These are good for shared code like error structs or functions that need to be used by multiple targets.
However, I have experienced some “quirks” with these.
If used to store AppIntents:
iOS will dynamically discover them, but watchOS will not, so the app will need an “
AppShortcutsProvider”.The framework will need this code as a “bridge”:
public struct FrameworkAppIntentsPackage: AppIntentsPackage {
    public static var includedPackages: [any AppIntentsPackage.Type] {
        []
    }

    public init() {}
}
Each target will need this code as a “bridge”:
struct TargetIntentsPackage: AppIntentsPackage {
    static var includedPackages: [any AppIntentsPackage.Type] {
        [
            FrameworkAppIntentsPackage.self
        ]
    }
}
Debugging
Xcode has the standard IDE debugging tools you’d expect, but the advice I’d give to fellow newbies is:
Your app isn’t slow to start up initially and you haven’t done anything wrong - it’s just waiting for the debugger to attach.
To debug widget extensions, select the “parent” scheme. For example, select the iOS App’s scheme to debug the iOS Widget Extension.
You don’t need to rebuild for changes to breakpoints to take effect.
Quirks
If renaming the target’s folder, you need to manually update the path at the target → “Build Settings” (search for the old folder name and then update items like “Info.plist File”) - Xcode does not do this automatically, for some reason.
If you’re about to install an app on an Apple Watch, ensure it’s connected to the Wi-Fi first in order to reduce the chance of network errors. If it happens anyway, restart the watch. This is a common frustration, apparently.
The “build” number may not be what you expect - it’s to identify unique uploads of a “marketing version” to App Store Connect. I think the label under “Build Settings” is a bit clearer: “Current Project Version”.
Simulators
Xcode’s Simulator can be used for iPhone, Watch (paired to another simulated iPhone), and iPad and is quite useful for rapidly testing, especially on different “hardware” and OS versions.
However, the most notable oddity / limitation to me is that not all of the usual Apple apps are installed (e.g., Notes is missing), and you can’t install the App Store.
App Store Connect
Every new version goes through 5 stages of checks:
Xcode build.
Xcode validation.
Xcode distribution.
App Store Connect validation.
App Store Connect review by a person.
Stage 4 was the most unexpected and is the most frustrating to me, because:
There is a period where Xcode said it was successfully checked and uploaded but it’s not in App Store Connect as an available build yet because this stage of checks is running.
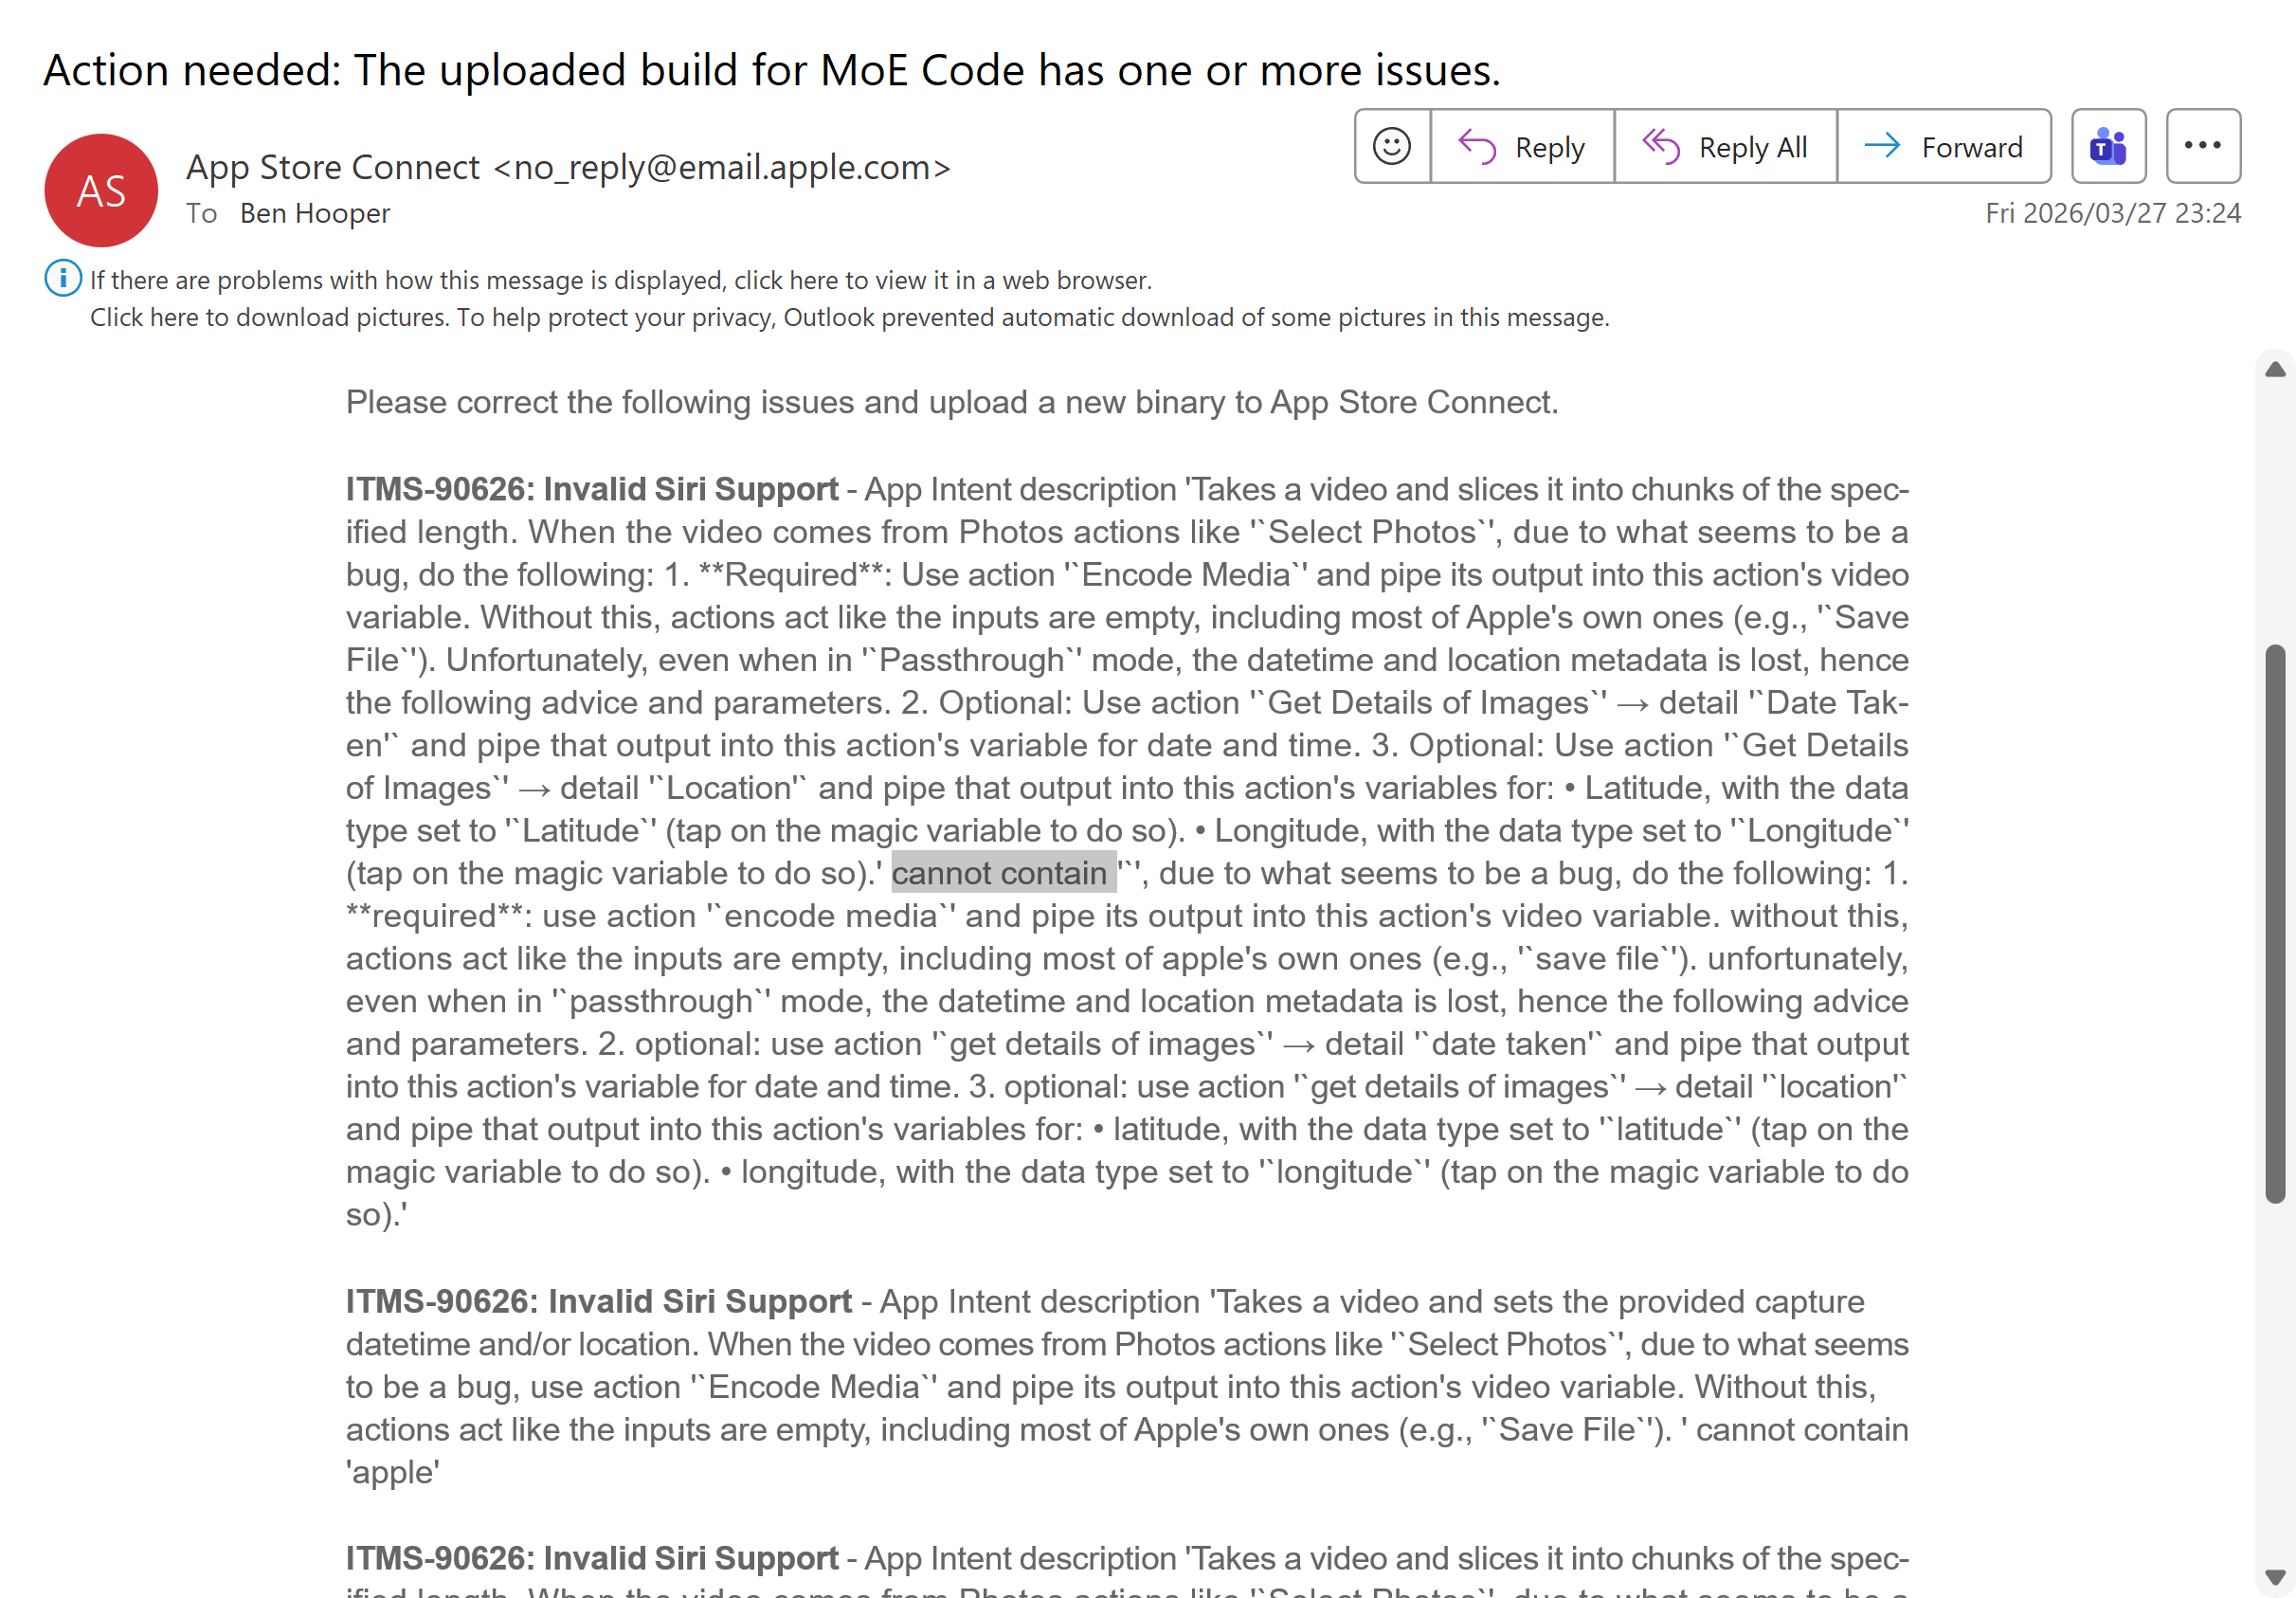
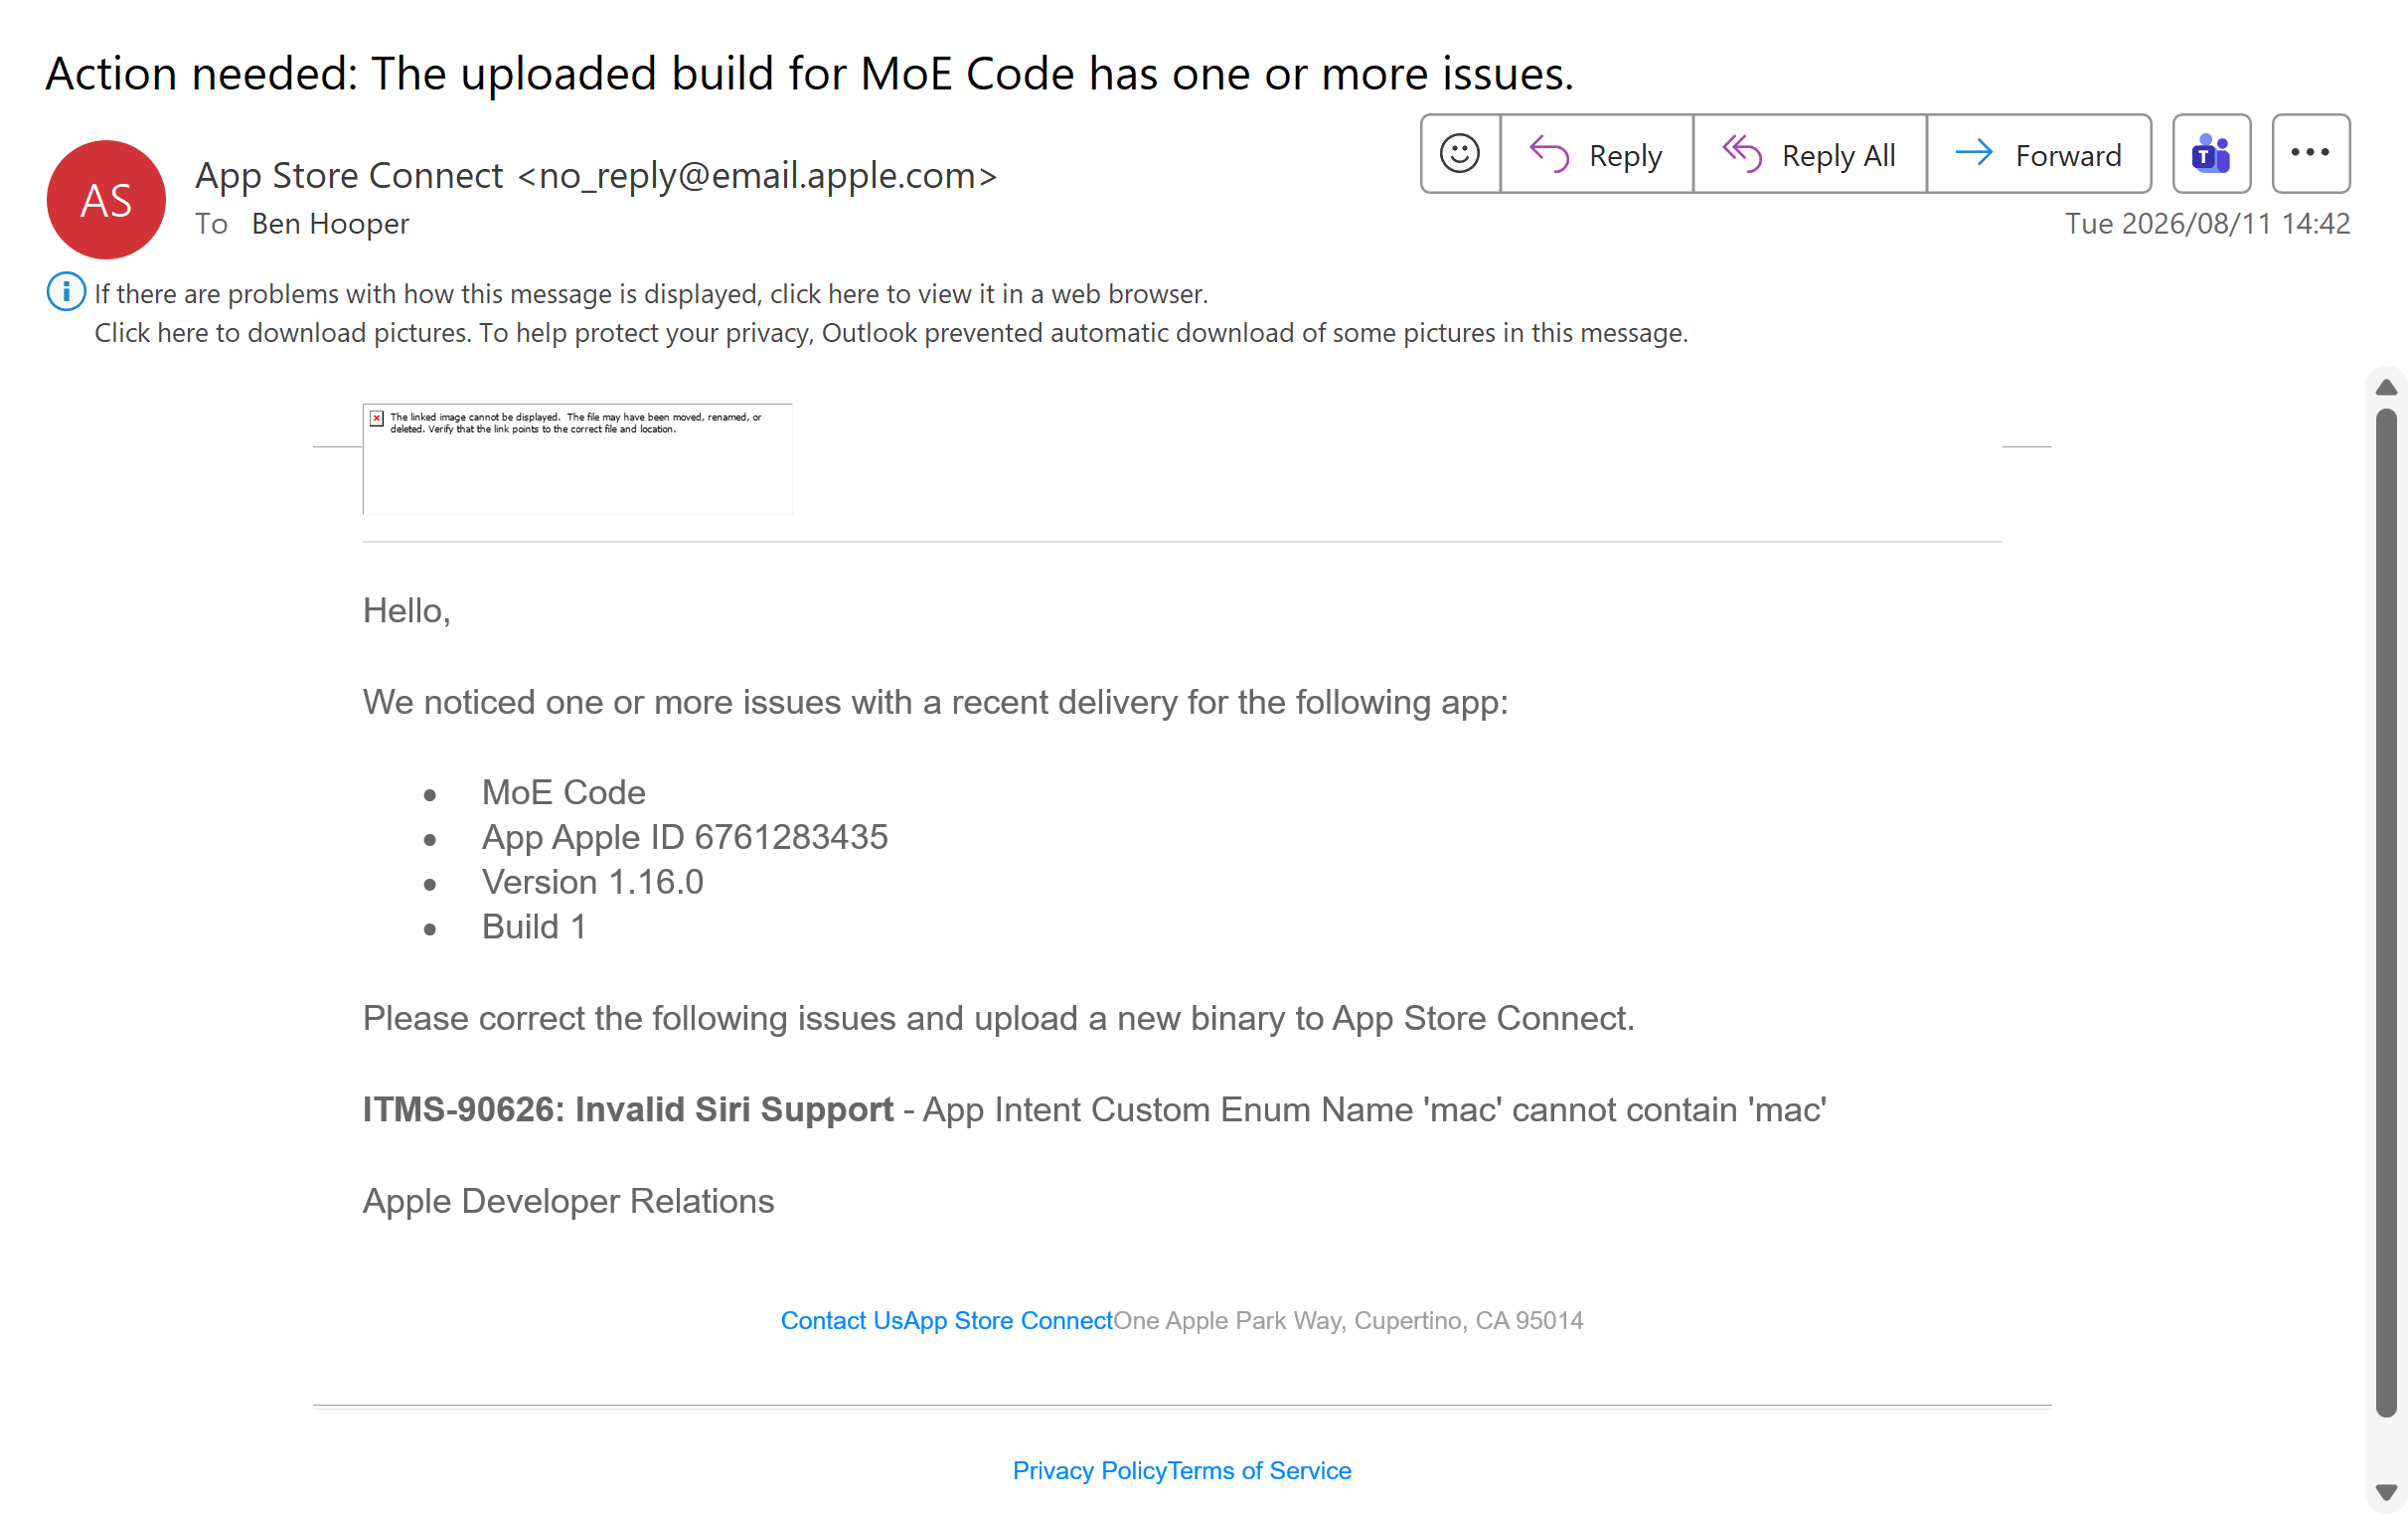
This is where Apple can reject your build if your code contains any of their brand names or even certain (undocumented) characters, which wasn’t exactly clear the first time, and legitimately limits how user-friendly and well-documented my Shortcuts actions can be. My most hated one is “ITMS-90626: Invalid Siri Support”. Real examples below that continue to this day:



However, stage 5 was very frustrating for the initial version, as I got some surprising pushback, most of which were questions you would think Apple could figure out for themselves. For example:
Rejection #1: “The 6.5-inch iPhone, 13-inch iPad, and Apple Watch screenshots only display a splash screen and do not show the actual app in use in the majority of the screenshots.” I didn’t think they’d allow screenshots of Shortcuts, as it’s not my app, but it turned out that they do. Speaking of screenshots, it’s immensely frustrating that you can’t just take a screenshot on your iPhone and upload it, as the dimensions are slightly off.
Rejection #2:
“Who is the main target of this app?”
“What is the purpose of this app?”
“Please provide us step-by-step instruction regarding how to use your app.”
Rejection #3: “We need a demo video that demonstrates the current version, 1.5.2, in use on a physical iOS and watchOS device.”
Getting my app live was a very frustrating process and literally took a month. This isn’t helped because the reviewers don’t reply to your messages asking for clarification - you’re just left to figure it out.
Oh, and one final bit of confusion is that “Ready for Distribution” is the status they use to mean that it’s now live. 🤷♂️
Sign-off
Well, there you have it. That’s how you go from 1 shortcut with fewer than 10 actions, to 40+ shortcuts with hundreds of actions each, to your own app with ~40 custom actions.
I hope it was of interest to someone. If you have any questions, feel free to reach out!