Index
Links to each section:
Intro
Before I get into anything, I have two important disclaimers:
These methods can be scaled up to support multiple users so if you plan on deploying this for more than just yourself then please ensure that you get explicit and informed consent from the other users - they need to be aware that you may very well be able to see their private information such as passwords and banking information.
If HTTPS inspection is going to be in place for sensitive connections and/or permanently then you need to ensure that the system is sufficiently secured (for example, strong authentication, regular patching, attack surface reduction, protection of the root CA private keys, trusted management / admin connections, audit trails, etc) but I won’t be covering that in this guide as that’s way out of scope.
Originally, this blog post was titled How to get offline installers from online installers (as such, some of the examples will be related to this), basically because, in order to do my job well, I need to obtain and keep many versions of the software’s installers but some software developers don’t publish URLs for offline installers. For example, Google with Drive’s Backup and Sync client app. However, as I experimented and researched, I realised that I’d essentially ended up writing “How to decrypt HTTPS for free” and that that would be more useful to more people. It’s also quite a bit of “How to set up a virtual network appliance”.
The simple, less reliable way
Local forward proxies are the easiest way to inspect outbound web connections and I found that Telerik’s Fiddler Web Debugging Proxy was the easiest to install and use, especially with HTTPS decryption.
In my research, I found that some applications simply ignore configured system-level proxies and, therefore, this won’t work in all cases.
Step #1: Download Fiddler
Fiddler can be downloaded from https://www.telerik.com/download/fiddler. (Their form doesn’t require email validation but if you want to avoid it then you can use https://telerik-fiddler.s3.amazonaws.com/fiddler/FiddlerSetup.exe instead.)
Step #2: Install Fiddler
Installation of Fiddler (version 5.0.20202.18177 is the latest as of writing) is very straight-forward - simply agree to the license then click Install. By default, it installs to %localAppData%\Programs\Fiddler\.
Step #3: Set up AppContainer exemptions
To do so:
Open Fiddler (there’s an entry in the Start Menu).
In the window
AppContainer Configuration, selectWinConfig.Authorise the User Account Control (UAC) prompt.
If the window
Orphaned Exemption Record Foundprompts, selectNo.In the window
AppContainer Loopback Exemption Utility, selectExempt Allor your own selection of apps →Save Changes.
![2020-06-18 13-09-00 - Windows_10_Pro_64-bit_2_(DL)_[Running]_-_Oracle_VM.png](https://images.squarespace-cdn.com/content/v1/55ca1042e4b07aa63f079ba0/1592756582531-M0UUXUHBUQJK0HTBZRO1/2020-06-18+13-09-00+-+Windows_10_Pro_64-bit_2_%28DL%29_%5BRunning%5D_-_Oracle_VM.png)
![2020-06-21 17-18-45 - Windows_10_Pro_64-bit_2_(DL)_[Running]_-_Oracle_VM.png](https://images.squarespace-cdn.com/content/v1/55ca1042e4b07aa63f079ba0/1592756590182-FRMUO77CH0NGNRLBKAXQ/2020-06-21+17-18-45+-+Windows_10_Pro_64-bit_2_%28DL%29_%5BRunning%5D_-_Oracle_VM.png)
![2020-06-21 17-19-55 - Windows_10_Pro_64-bit_2_(DL)_[Running]_-_Oracle_VM.png](https://images.squarespace-cdn.com/content/v1/55ca1042e4b07aa63f079ba0/1592756765216-OKO2TIO1V301R5FK0LZX/2020-06-21+17-19-55+-+Windows_10_Pro_64-bit_2_%28DL%29_%5BRunning%5D_-_Oracle_VM.png)
![2020-06-21 17-22-16 - Windows_10_Pro_64-bit_2_(DL)_[Running]_-_Oracle_VM.png](https://images.squarespace-cdn.com/content/v1/55ca1042e4b07aa63f079ba0/1592756767853-1A5BMZ10SWCN0Y5RQO0U/2020-06-21+17-22-16+-+Windows_10_Pro_64-bit_2_%28DL%29_%5BRunning%5D_-_Oracle_VM.png)
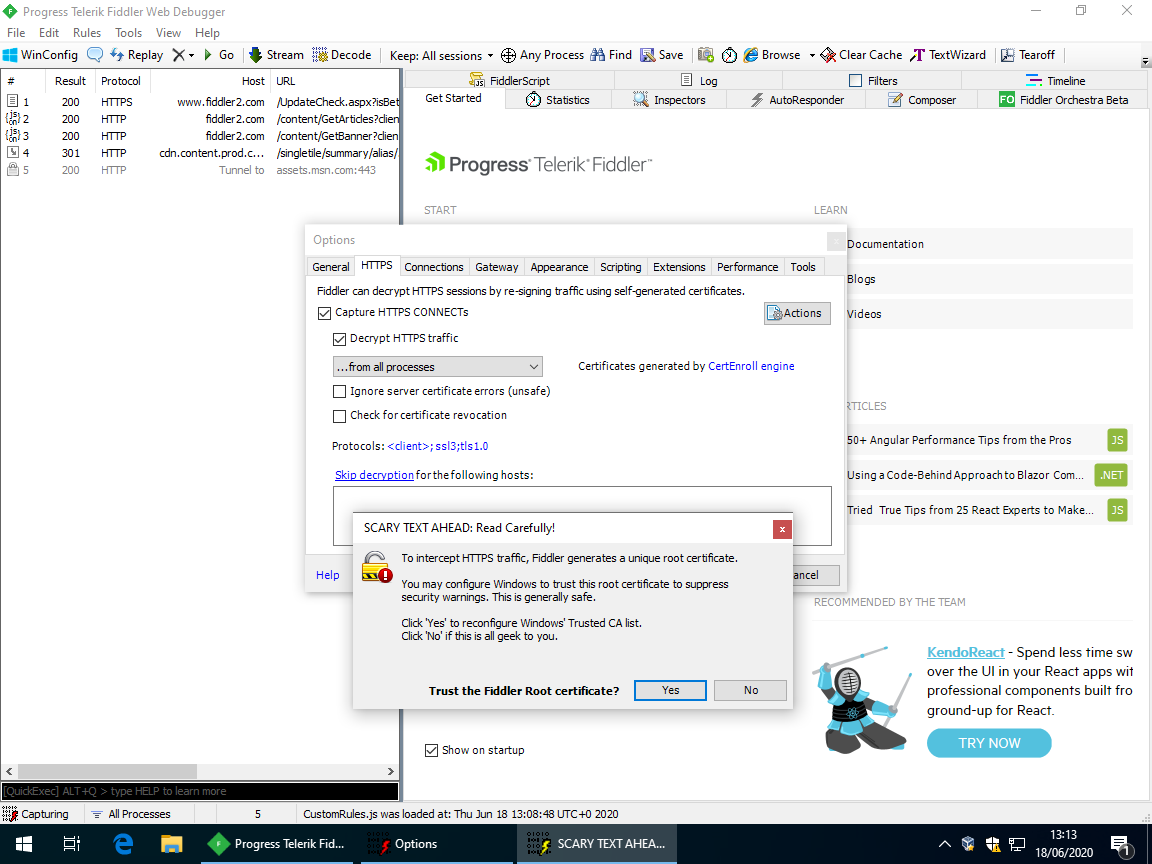
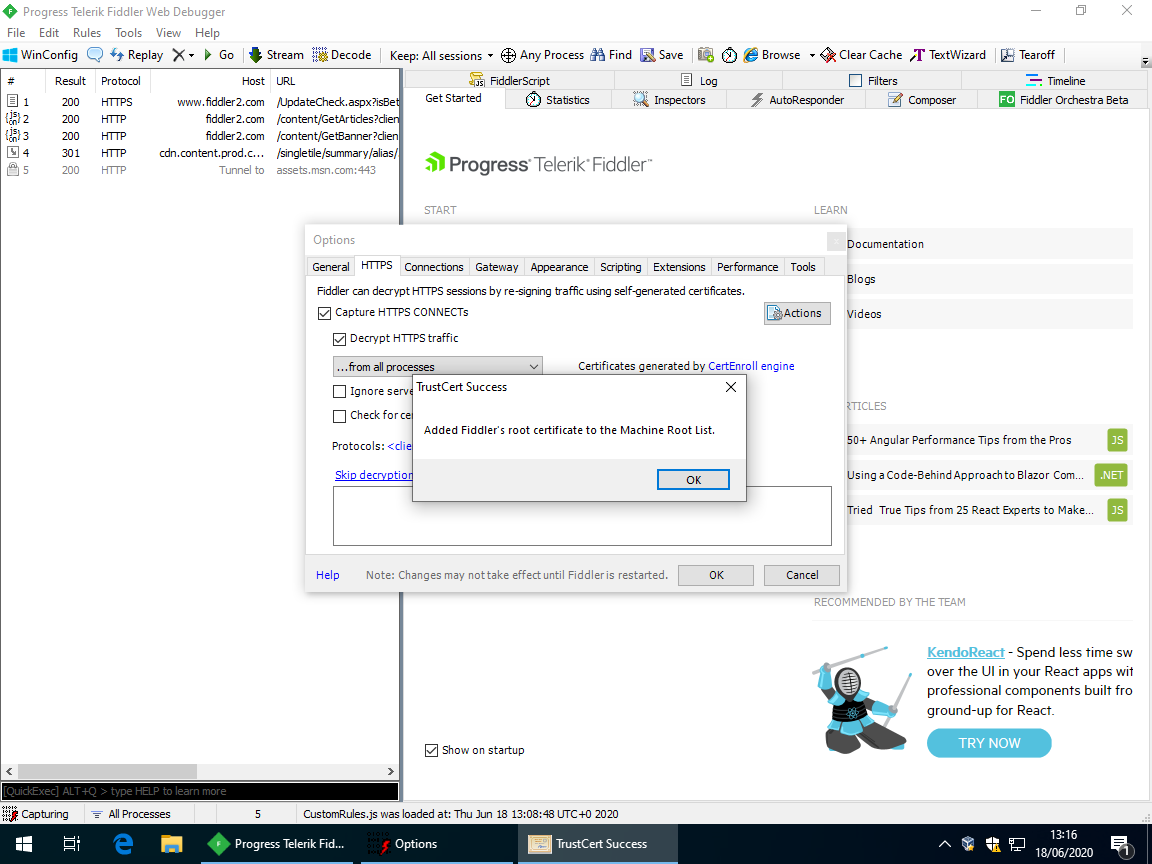
Step #4: Set up HTTPS decryption
Fiddler needs to generate a root Certificate Authority (CA) certificate and have Windows trust it so that it can perform Man-in-the-Middle (MITM) operations to decrypt and inspect the HTTPS connections.
To do this:
Select
Tools→Options…→HTTPS.Tick
Decrypt HTTPS traffic.In Fiddler’s window prompt
SCARY TEXT AHEAD: Read Carefully!, selectYes.In both Windows prompts (
Security WarningandAdd certificate to the Machine Root List?), selectYes.Fiddler will now elevate itself so, in the User Account Control (UAC) window prompt, select
Yes.You should now see Fiddler window prompt
TrustCert Success.Also, ensure that
…from all processesis set.


Step #5: Set up the view
What we’re looking for is HTTP GET requests. The easiest way that I’ve found to see these is to choose any packet, select Inspectors, then select Raw.
Step #6: Monitor connections
Now you can see HTTP GET requests and other traffic.
The advanced, more reliable way
As previously mentioned, some applications aren’t designed to utilise configured proxies. This means that we have to do this at a lower level so the apps have no choice but to have their traffic inspected.
Naturally, I looked into Wireshark as it works at the lower, network interface / adapter level and is, in their own words, “the world's foremost and widely-used network protocol analyzer”. However, according to their own Wiki, it can only decrypt TLS traffic in two ways:
“Key log file using per-session secrets (#Using_the_.28Pre.29-Master-Secret)”.
I experimented with this and found that it relies on apps recognising and utilising the cross-platform environment variableSSLKEYLOGFILEwhich only a handful of apps such as Mozilla Firefox and Google Chrome actually do. So, this method isn’t usable for us.“Decryption using an RSA private key”.
As far as I’m aware, this requires that we have the actual private key for each encrypted connection which obviously isn’t usable for us either.
So, we have to go another level lower. Down to the gateway level. To do that, we need to set up a virtual network appliance.
Step #1: Download and install VirtualBox
VirtualBox is Oracle’s free hypervisor which is incredibly useful. Its installer can be downloaded from https://www.virtualbox.org/wiki/Downloads and installation is very straight-forward. The Extension Pack is not required.
Step #2: Download and extract pfSense Community Edition
pfSense is an open source firewall/router based on FreeBSD. Its installation media (370+ MB compressed, 710+ MB uncompressed) can be downloaded from https://www.pfsense.org/download/?section=downloads and, in this scenario, you should use the following options:
Architecture:
AMD64 (64-bit)Installer:
CD Image (ISO) Installer
Step #3: Create a pfSense VM
To do this:
Open VirtualBox.
Select
Machine→New…→Expert Modeand set the following basic VM options:Name:
pfSenseor whatever you prefer.Machine Folder: wherever you prefer.
Type:
BSDVersion:
FreeBSD (64-bit)Memory size:
1024 MBor higherHard disk:
Create a hard disk now
Select
Createand set the following virtual hard disk options:File location: wherever you prefer
File size:
25 GB(expanding later will likely be tricky)Hard disk file type:
VMDK (Virtual Machine Disk)or whatever you prefer.
In this case, this doesn’t really matter but I think it’s a good habit as it has the best compatibility with other software in my experience.Storage on physical hard disk:
Dynamically allocatedor whatever you prefer.Again, in this particular case, this doesn’t really matter but this option saves actual storage drive usage at the cost of a slight performance hit.
Step #4: Configure the pfSense VM
First, we need to “insert” the installation media “disc”. To do this:
Select the pfSense VM →
SettingsSelect
Storage→ underController: IDE, the disc icon → to the right ofOptical Drive:, the disc icon with a downwards-pointing arrow →Choose a disk file…Choose the ISO file extracted from step #3.
Second and last (for this step), we need to configure the network adapters. Any kind of routing device needs at least two Network Interface Controllers (NICs) - one for the Local Area Network (LAN) and one for the Wide Area Network (WAN). To do this:
Select the pfSense VM →
Settings→NetworkSelect
Adapter 1, ensure thatEnable Network Adapteris ticked, and setAttached totoBridged Adapter.Select
Adapter 2, ensure thatEnable Network Adapteris ticked, and setAttached totoBridged Adapter.


Step #5: Check IP addresses
The pfSense’s LAN NIC defaults to static IPv4 address 192.168.1.1/24 and, because we’re using bridged network adapters with the VM which emulate a physical connection, that can temporarily cause conflict problems on the LAN if the IP address is already in use, especially if it’s important. For example, if 192.168.1.1 is the LAN IP address of your actual router / default gateway, as it is by default in a lot of cases, then your devices likely won’t be able to reliably connect to the Internet until the one of the addresses is changed.
If you need to use a different IP address, choose one (ideally outside of the DHCP scope) and ensure that it is not in use. The quickest and most reliable way to do this in my experience is to open Command Prompt or Windows PowerShell and execute command ping <IP address> until the response is Destination host unreachable.
Step #6: Install the pfSense OS
To do this:
1. In VirtualBox, select the pfSense VM → Start.
A new window will open displaying the VM’s console (what you would see if you plugged a monitor into a physical computer) and you’ll see a few boot screens but eventually you should get to the pfSense installer screen.
Tip: If your focus gets “stuck” / your cusor “disappears” in the VM console, press the right-hand Ctrl key.

![2020-06-18 15-05-25 - pfSense_[Running]_-_Oracle_VM_VirtualBox.png](https://images.squarespace-cdn.com/content/v1/55ca1042e4b07aa63f079ba0/1592489254336-IVDUEEK5QLC21ZUIXKZM/2020-06-18+15-05-25+-+pfSense_%5BRunning%5D_-_Oracle_VM_VirtualBox.png)
![2020-06-18 15-06-25 - pfSense_[Running]_-_Oracle_VM_VirtualBox.png](https://images.squarespace-cdn.com/content/v1/55ca1042e4b07aa63f079ba0/1592489256526-F5PZAHX05Z5UWI5M9116/2020-06-18+15-06-25+-+pfSense_%5BRunning%5D_-_Oracle_VM_VirtualBox.png)
![2020-06-18 15-06-47 - pfSense_[Running]_-_Oracle_VM_VirtualBox.png](https://images.squarespace-cdn.com/content/v1/55ca1042e4b07aa63f079ba0/1592489259336-97QVYEJMIZ5OFSG3JAM3/2020-06-18+15-06-47+-+pfSense_%5BRunning%5D_-_Oracle_VM_VirtualBox.png)
2. Accept the license / terms by ensuring that Accept is selected (it is by default but press tab if not) then pressing a (as highlighted), return, or enter.
3. Ensure that Install is selected (it is by default) then select OK.
4. Choose a keymap (keyboard layout). By default, it’s set to US so it’s a good idea to correct this if required. I’m British so I choose United Kingdom then Continue with uk.kbd keymap.
![2020-06-18 15-17-44 - pfSense_[Running]_-_Oracle_VM_VirtualBox.png](https://images.squarespace-cdn.com/content/v1/55ca1042e4b07aa63f079ba0/1592489925914-Y6TVHA1ENDQK4QEWWBDG/2020-06-18+15-17-44+-+pfSense_%5BRunning%5D_-_Oracle_VM_VirtualBox.png)
![2020-06-18 15-18-01 - pfSense_[Running]_-_Oracle_VM_VirtualBox.png](https://images.squarespace-cdn.com/content/v1/55ca1042e4b07aa63f079ba0/1592489977977-8V4U6BQTJO8P4VHF7PIL/2020-06-18+15-18-01+-+pfSense_%5BRunning%5D_-_Oracle_VM_VirtualBox.png)
5. Select partitioning option Auto (UFS).
6. Wait for the OS to install.
7. Select No to manual changes then Reboot.
![2020-06-18 15-24-37 - pfSense_[Running]_-_Oracle_VM_VirtualBox.png](https://images.squarespace-cdn.com/content/v1/55ca1042e4b07aa63f079ba0/1592490335015-WPXGHDLY7BC8GBQ0V5QS/2020-06-18+15-24-37+-+pfSense_%5BRunning%5D_-_Oracle_VM_VirtualBox.png)
![2020-06-18 15-25-17 - pfSense_[Running]_-_Oracle_VM_VirtualBox.png](https://images.squarespace-cdn.com/content/v1/55ca1042e4b07aa63f079ba0/1592490335470-1Q5J3X132K6SCDVB5R80/2020-06-18+15-25-17+-+pfSense_%5BRunning%5D_-_Oracle_VM_VirtualBox.png)
8. The VM will keep booting to the ISO file / virtual disc again, rather than its own OS on the virtual hard disk, so we need to reverse step 4.1 by:
1. Selecting Machine → Settings… → Storage → disc icon → disc icon with downwards-pointing arrow → Host Drive → OK.
2. Selecting Machine → Reset.

![2020-06-18 15-31-54 - pfSense_[Running]_-_Oracle_VM_VirtualBox.png](https://images.squarespace-cdn.com/content/v1/55ca1042e4b07aa63f079ba0/1592490734058-I9JOVW9MOK5M5TM3VT50/2020-06-18+15-31-54+-+pfSense_%5BRunning%5D_-_Oracle_VM_VirtualBox.png)
Step #8: Set pfSense’s LAN IP address
To do this:
At pfSense’s console main menu, input
2and press return / enter twice.Complete the configuration wizard:
New LAN IPv4 address: The one you chose in step #5.
New LAN IPv4 subnet bit count: Copy that of the WAN. It’s probably
24.New LAN IPv4 upstream gateway address: None.
New LAN IPv6 address: None.
Enable DHCP server on LAN:
nRevert webConfigurator (admin web UI) protocol to HTTP:
yorn, whatever you prefer.
![2020-06-18 16-00-15 - pfSense_[Running]_-_Oracle_VM_VirtualBox.png](https://images.squarespace-cdn.com/content/v1/55ca1042e4b07aa63f079ba0/1592492490209-2YGQB5PFQJW1IFQ2WNNB/2020-06-18+16-00-15+-+pfSense_%5BRunning%5D_-_Oracle_VM_VirtualBox.png)
![2020-06-18 16-00-58 - pfSense_[Running]_-_Oracle_VM_VirtualBox.png](https://images.squarespace-cdn.com/content/v1/55ca1042e4b07aa63f079ba0/1592492505793-KPOO6RCQ0D7WOU1B3DRI/2020-06-18+16-00-58+-+pfSense_%5BRunning%5D_-_Oracle_VM_VirtualBox.png)
![2020-06-18 16-01-07 - pfSense_[Running]_-_Oracle_VM_VirtualBox.png](https://images.squarespace-cdn.com/content/v1/55ca1042e4b07aa63f079ba0/1592492512678-MRQDN6O0WGHC59ZTHM9V/2020-06-18+16-01-07+-+pfSense_%5BRunning%5D_-_Oracle_VM_VirtualBox.png)
Step #9: Sign into pfSense’s admin web interface
To do this:
Open a web browser on one of your devices and browse to the URL of your pfSense. In these examples, mine is
https://192.168.1.253.Enter the default admin credentials:
Username:
adminPassword:
pfsense
Step #10: Set up and export pfSense’s root CA certificate
As with Fiddler (and any HTTPS inspection software), pfSense needs generate its own root Certificate Authority (CA) certificate so that it can perform Man-in-the-Middle (MITM) operations to decrypt and inspect the HTTPS connections.
To do this:
Select
System→Cert. Manager→+ Add.Set the following information:
Descriptive name:
pfSense Root CAor whatever you prefer.Method:
Create an internal Certificate Authority.Key length:
2048or higher.Digest Algorithm:
sha256or higher.Lifetime: Whatever you prefer but it should be a few years at least.
Common Name:
pfSense Root CAor whatever you prefer. This is what will be displayed in web browsers, etc.Country Code: Refer to https://www.ssl.com/country-codes/
State or Province: Whatever you prefer.
City: Whatever you prefer.
Organization: Whatever you prefer.
Organizational Unit: Whatever you prefer.
Select
Save.Select the star / sun / award symbol to export the CA certificate and save it as you’ll need it later.


Step #11: Install Squid
Squid is forward proxy software that is capable of inspecting HTTPS. To install it in pfSense:
Select
System→Package Manager→Available Packages.Search for
squidthen selectInstall→Confirm.


Step #12: Configure Squid
Now that Squid is installed, we need to configure it enabling HTTPS inspection and access logging:
Select
Services→Squid Proxy Server.Select
Local Cache→Saveto confirm the configuration (needs to be done or the next step will fail and you’ll have to re-set everything again).Select
Generaland make the following changes to the default configuration:Enable Squid Proxy: Ticked
Transparent HTTP Proxy: Ticked
HTTPS/SSL Interception: Ticked
CA:
pfSense Root CAor whatever you named yoursEnable Access Logging: Ticked


Step #12: Configure end user device networking
Each end user device needs to be reconfigured so that its default gateway is the pfSense’s LAN IP address. This will force all network traffic to be sent to and inspected by the pfSense VM.
To do this for all devices, you’ll want to reconfigure your DHCP server.
To do for one Windows device:
Open Command Prompt or Windows PowerShell, execute command
ipconfig /all, and make a note of the active NIC’s IPv4 address, subnet mask, and DNS servers.Open the Start Menu and search for and open
View network connections.Alt-select (right-click) on whichever NIC is being used then select
Properties→Internet Protocol Version 4 (TCP/IPv4)(the text, not the checkbox) →Properties.Select
Use the following IP addressand enter the pfSense’s LAN IP address as the default gateway and everything else the same as it was in the output ofipconfig /all.Select
OK→Close.


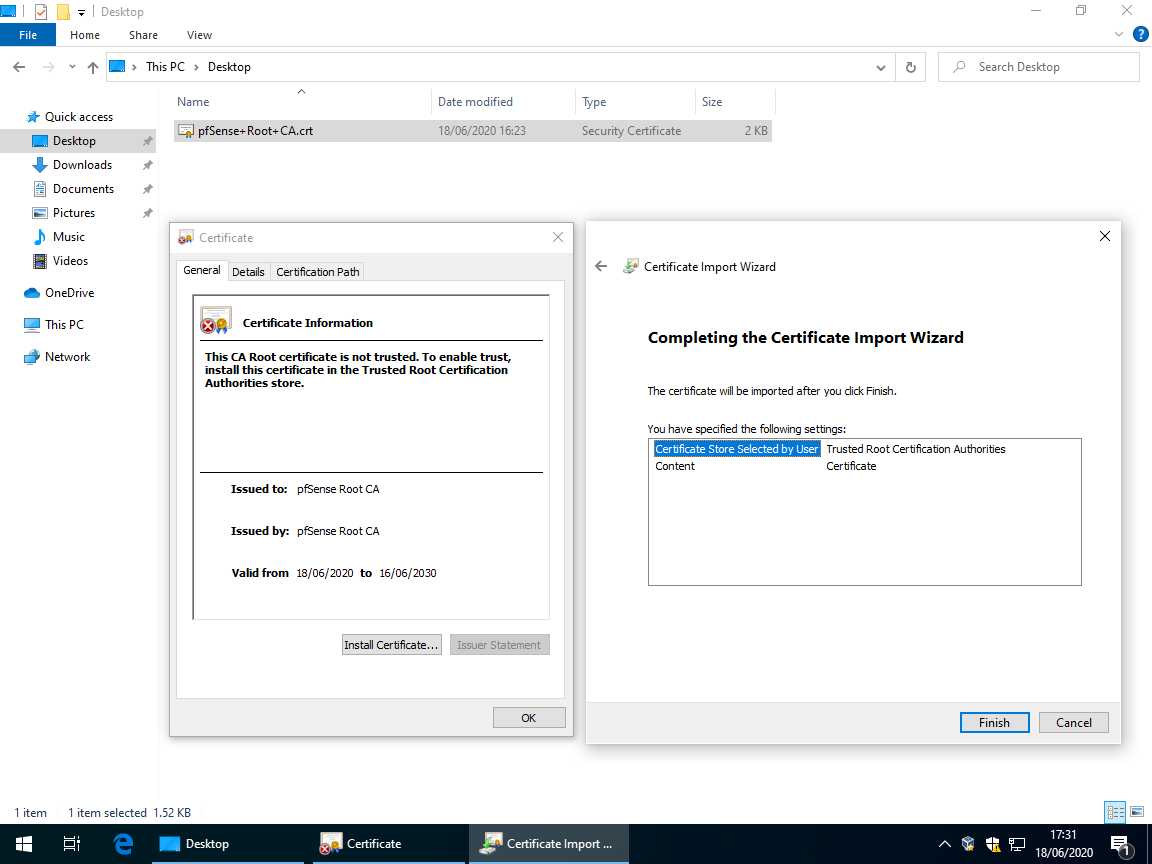
Step #13: Configure end user device certificates
Now we need to get the end user devices to trust the pfSense’s root CA. If this isn’t done, they’ll display a ton of security warnings / errors, as you can see below. After all, this is the whole point of Public Key Infrastructure (PKI), HTTPS, etc.
To do this on Windows:
Copy over the
CRTfile from step #10 and open it.Select
Install certificate…→Current UserorLocal Machine(depending on your preference) →Next→Place all certificates in the following store→Browse…→Trusted Root Certification Authorities→OK→Next→Finish→Yes.


You can now see that HTTPS connections signed by pfSense are trusted:
Step #14: Monitor connections
If you browse to pfSense → Services → Squid Proxy Server → Real Time → Squid Access Table, you should now see a list of URLs being accessed in real-time (the page automatically updates every few seconds).
Step #15: Whitelist FQDNs, if required
Due to things like HTTP Public Key Pinning (HPKP), client certificate authentication, and certificate attributes that are lost when proxied, some applications simply do not like their HTTPS connections being inspected and refuse to function unless their Fully-Qualified Domain Names (FQDNs) are whitelisted and, therefore, excluded from HTTPS inspection. If this is the case, you’ll likely see something like the following:
TCP_TUNNEL_ABORTED/200 client.dropbox.com:443
To whitelist FQDNs in Squid on pfSense, simply go to Services → Squid Proxy Server → ACLs → Whitelist.
Hello, World!
A CSV of known FQDNs that must be whitelisted is available here: https://mythofechelon.co.uk/s/SSLTLS-decryption-exclusions.csv
Un-trusting root CAs
Chances are that you only wanted HTTPS inspection to inspect a specific application or something so you won’t want to leave the system in place.
So, to delete or “un-trust” a root Certificate Authority (CA) on Windows if your user account does have local administrative permissions:
Open
certmgr.msc.
Even though it saysCertificates - Current User, the certificates listed are actually a combination of that of the local machine and current user. So this will work regardless of whether you installed the root CA certificate into the local machine’s or the current user’s store.Expand
Trusted Root Certification Authoritiesthen selectCertificates.Alt-select (right-click) on the pfSense certificate then select
Delete.
![2020-06-19 11-12-34 - Windows_10_Pro_64-bit_2_(DL)_[Running]_-_Oracle_VM.png](https://images.squarespace-cdn.com/content/v1/55ca1042e4b07aa63f079ba0/1592562785835-T44MWIFELSH9A398ICV7/2020-06-19+11-12-34+-+Windows_10_Pro_64-bit_2_%28DL%29_%5BRunning%5D_-_Oracle_VM.png)
![2020-06-19 11-16-00 - Windows_10_Pro_64-bit_2_(DL)_[Running]_-_Oracle_VM.png](https://images.squarespace-cdn.com/content/v1/55ca1042e4b07aa63f079ba0/1592562854200-5UXJUTO44LPDGSPG8QYL/2020-06-19+11-16-00+-+Windows_10_Pro_64-bit_2_%28DL%29_%5BRunning%5D_-_Oracle_VM.png)
![2020-06-19 11-16-31 - Windows_10_Pro_64-bit_2_(DL)_[Running]_-_Oracle_VM.png](https://images.squarespace-cdn.com/content/v1/55ca1042e4b07aa63f079ba0/1592562858595-V2TDFMTNNGH2FNEHBCLU/2020-06-19+11-16-31+-+Windows_10_Pro_64-bit_2_%28DL%29_%5BRunning%5D_-_Oracle_VM.png)
![2020-06-19 11-16-39 - Windows_10_Pro_64-bit_2_(DL)_[Running]_-_Oracle_VM.png](https://images.squarespace-cdn.com/content/v1/55ca1042e4b07aa63f079ba0/1592562860554-MZXCL4IMB469CKRJEQVZ/2020-06-19+11-16-39+-+Windows_10_Pro_64-bit_2_%28DL%29_%5BRunning%5D_-_Oracle_VM.png)
To delete or “un-trust” a root Certificate Authority (CA) on Windows if your user account does not have local administrative permissions:
Open mmc.exe as admin.
Authenticate the UAC prompt.
Select
File→Add/Remove Snap-in…→Certificates→Add >→Computer account→Next→Finish→OK.Expand
Certificates (Local Computer)→Trusted Root Certification Authoritiesthen selectCertificates.Alt-select (right-click) on the pfSense certificate then select
Delete.
![2020-06-19 11-35-48 - Windows_10_Pro_64-bit_2_(DL)_[Running]_-_Oracle_VM.png](https://images.squarespace-cdn.com/content/v1/55ca1042e4b07aa63f079ba0/1592563193732-7XI8BWEFQVC2XI4K9MSF/2020-06-19+11-35-48+-+Windows_10_Pro_64-bit_2_%28DL%29_%5BRunning%5D_-_Oracle_VM.png)
![2020-06-19 11-36-21 - Windows_10_Pro_64-bit_2_(DL)_[Running]_-_Oracle_VM.png](https://images.squarespace-cdn.com/content/v1/55ca1042e4b07aa63f079ba0/1592563200696-0WW0DOT0BN319RN3XU1K/2020-06-19+11-36-21+-+Windows_10_Pro_64-bit_2_%28DL%29_%5BRunning%5D_-_Oracle_VM.png)
![2020-06-19 11-37-29 - Windows_10_Pro_64-bit_2_(DL)_[Running]_-_Oracle_VM.png](https://images.squarespace-cdn.com/content/v1/55ca1042e4b07aa63f079ba0/1592563205302-U0WAX2KL0A9MBW7TYZID/2020-06-19+11-37-29+-+Windows_10_Pro_64-bit_2_%28DL%29_%5BRunning%5D_-_Oracle_VM.png)
![2020-06-19 11-38-14 - Windows_10_Pro_64-bit_2_(DL)_[Running]_-_Oracle_VM.png](https://images.squarespace-cdn.com/content/v1/55ca1042e4b07aa63f079ba0/1592563209435-3NO1CPBCOH9CCL991ZCM/2020-06-19+11-38-14+-+Windows_10_Pro_64-bit_2_%28DL%29_%5BRunning%5D_-_Oracle_VM.png)
![2020-06-19 11-38-33 - Windows_10_Pro_64-bit_2_(DL)_[Running]_-_Oracle_VM.png](https://images.squarespace-cdn.com/content/v1/55ca1042e4b07aa63f079ba0/1592563212814-M2RNKWB407MZT0I4J32R/2020-06-19+11-38-33+-+Windows_10_Pro_64-bit_2_%28DL%29_%5BRunning%5D_-_Oracle_VM.png)
![2020-06-19 11-38-52 - Windows_10_Pro_64-bit_2_(DL)_[Running]_-_Oracle_VM.png](https://images.squarespace-cdn.com/content/v1/55ca1042e4b07aa63f079ba0/1592563216715-B59QV1C4DJ7H1542FCWI/2020-06-19+11-38-52+-+Windows_10_Pro_64-bit_2_%28DL%29_%5BRunning%5D_-_Oracle_VM.png)
![2020-06-19 11-47-08 - Windows_10_Pro_64-bit_2_(DL)_[Running]_-_Oracle_VM.png](https://images.squarespace-cdn.com/content/v1/55ca1042e4b07aa63f079ba0/1592563712535-K59OQJDW1I4GRIUCDIWA/2020-06-19+11-47-08+-+Windows_10_Pro_64-bit_2_%28DL%29_%5BRunning%5D_-_Oracle_VM.png)
![2020-06-19 11-47-48 - Windows_10_Pro_64-bit_2_(DL)_[Running]_-_Oracle_VM.png](https://images.squarespace-cdn.com/content/v1/55ca1042e4b07aa63f079ba0/1592563716553-DJXXKAR5HNVFVD63XV9I/2020-06-19+11-47-48+-+Windows_10_Pro_64-bit_2_%28DL%29_%5BRunning%5D_-_Oracle_VM.png)
![2020-06-19 11-47-56 - Windows_10_Pro_64-bit_2_(DL)_[Running]_-_Oracle_VM.png](https://images.squarespace-cdn.com/content/v1/55ca1042e4b07aa63f079ba0/1592563719639-RHLG1CUZEL4H2ETD49MG/2020-06-19+11-47-56+-+Windows_10_Pro_64-bit_2_%28DL%29_%5BRunning%5D_-_Oracle_VM.png)
Your PC will now no longer trust connections signed by pfSense and, therefore, will display warnings again.
Sign-off
I hope that this has been useful.
Feel free to subscribe to my newsletter to be automatically notified of new blog posts in the future.
😊